Connect the first computer, tablet or phone to your store using the owner's sign-in.
For: Managers and owners
Open the till at kiobomerce.com/pos, or open the Kiobomerce app.
On Set up this terminal, press First till for this store? Sign in as the owner, then enter the owner or manager username and password.
Choose your store and location, and give this device a name such as Front counter.
Choose your till PIN: 4 to 8 digits, not a sequence like 1234.
Wait for Downloading store settings to finish. The till needs the internet this once to fetch prices, tax rules and staff.
After this first download the till can sell without internet.
Add another till with a setup code
Join a new device to your store without sharing any password.
For: Managers and owners
On a till that is already working, go to Manage, then Tills.
Press Set up a new till and approve with a manager PIN. You get a code like ABCD-EFGH.
On the new device, open the till. Set up this terminal asks for the setup code.
Type the code, name the device and continue. This needs the internet.
A setup code works once and lasts 15 minutes.
Your plan sets how many tills you can have. If you reach the limit, ask us to add extra tills.
Install Kiobomerce on a phone or computer
Use the Android app, or install the till from your browser on a computer.
Android: on kiobomerce.com press Download for Android, open the file and allow the install when your phone asks.
Computer: open kiobomerce.com/pos in Chrome or Edge and choose Install from the address bar or browser menu.
Open the installed app and follow Set up your first till, or use a setup code.
An iPhone and iPad app is not available yet. Use the till in Safari instead.
Unlock the till with your PIN
Choose your name and enter your PIN. Each sale is recorded against the person signed in.
On Who's on the till?, press your name.
Type your PIN.
When you step away, press Lock at the top. The till also locks itself after 10 idle minutes.
Forgot your PIN? A manager can set a new one under Manage, then Staff, then Set PIN.
Ask Kiobomerce for help
Send a question or problem to the Kiobomerce team from the till, even without internet.
Open Help and press Ask Kiobomerce for help.
Choose what it is about and say what happened. Add a phone number if you want a call.
Press Send. We reply by phone or email.
Without internet the request waits on the till like a sale, and goes when the internet is back.
The till's sync state goes with it, so we can see the problem straight away.
Selling
Make a sale
Scan or tap products, charge the customer and print the receipt.
For: Cashiers, Managers and owners
Go to Sell. Scan a barcode, tap a product or search for it.
Check the lines on the right. Tap a line to change it.
Press Charge.
Choose how the customer is paying. For cash, enter the amount received and the till shows the change to give.
Finish the sale. The receipt prints if a printer is set up, and New sale starts the next one.
A customer can split a sale across payment methods: add one payment, then add another for what is left.
Water and other bulk items can have lower prices at higher quantities. The till applies them by itself.
Sell when there is no internet
Keep selling. Sales are saved on the device and sent when the connection returns.
Carry on selling as normal. Cash and offline card sales work with no internet.
Keep the device on and its storage intact. Sales wait on this device until they are sent.
When the connection returns, the till sends everything by itself, in order. The sync badge at the top shows what is waiting.
QR and online payments need the internet, so they are unavailable while offline.
Do not clear browser data or uninstall the app while sales are waiting. Check Manage, then Sync first.
Give a discount
Take an amount or a percentage off a sale, with a reason and a manager's approval.
For: Cashiers, Managers and owners
With items in the sale, press Discount.
If you are not a manager, ask one to enter their PIN to approve it.
Enter an amount, or a percentage such as 10%, and a reason.
Press Apply.
Every discount is recorded with who gave it, who approved it and why.
Refund a sale
Refund all or part of a sale, and put the goods back in stock if they can be sold again.
For: Cashiers, Managers and owners
Go to Orders and open the sale.
Press Refund. A manager approves with their PIN.
Choose the items and quantities, give a reason and say whether they go back into stock.
Confirm, then give the customer their money. The refund slip prints if a printer is set up.
A sale made on another till can be refunded too. That lookup needs the internet.
A sale cannot be refunded for more than was paid, even from two tills at once.
A sale on credit is refunded to the customer's account unless you choose cash: no money changes hands.
Sell on credit and keep a customer book
Let trusted customers take goods now and pay later. The till keeps each customer's account instead of a notebook, and works without internet.
For: Cashiers, Managers and owners
Open the Customers tab and press Add a customer. Enter their name and phone number.
A manager can set a Credit limit: the most this customer may owe. Leave it empty for no limit.
To sell on credit, ring up the sale as usual and press Charge. Choose On credit, then Choose the customer.
Press Put … on their account. If you are a cashier, a manager approves with their PIN.
The receipt shows the customer's name and what they owe the store now.
If they are over their limit, the till warns you first. A manager can still allow it.
Works without internet. Each till shows the latest amounts after it syncs.
A refund of a credit sale goes back to the customer's account by itself, unless you choose cash.
The customer book can only be added to. Mistakes are put right with a refund or a payment, so nothing is ever lost.
Take a payment from a customer who owes
Record money a customer pays towards their account, print a slip, and remind them on WhatsApp.
For: Cashiers, Managers and owners
Open the Customers tab and tap the customer. Tick Only those who owe to see who owes.
Press Take a payment. Enter the amount, or press All of it.
Choose how they paid: Cash, Bank transfer, Card or Other, then press Receive.
A payment slip prints with what they still owe.
Press Remind on WhatsApp to send a polite message with their balance. It opens WhatsApp with the message ready; you press send.
Press Show the account to see every sale on credit and payment, with the balance after each. This needs the internet.
Cash paid towards a debt goes into the drawer, so it is part of the cash expected when the shift closes.
Taking cash needs an open shift when your store uses shifts.
Print a receipt again
Reprint the receipt for an earlier sale on this till.
For: Cashiers, Managers and owners
Go to Orders.
Open the sale.
Press Reprint.
Run tables and tabs in a restaurant or bar
Open a table, send orders to the kitchen and take payment when guests finish.
For: Cashiers, Managers and owners
Go to Tables and tap a table, or choose New takeaway order.
Add items, then press Send to kitchen. The ticket goes to the kitchen printer.
Press Print bill when the guests ask for it.
Press Charge to take payment and close the table.
Managers can arrange tables under Manage, then Floor plan.
This screen appears only for stores that use tables.
Sell drinks that need an age check
The till asks you to check the customer's age before an age-restricted sale.
For: Cashiers, Managers and owners
Add the item as normal.
When the till asks for an ID check, look at the customer's ID.
Confirm only if the customer is old enough. Otherwise remove the item.
This check is saved with the sale.
Shifts and cash
Open a shift
Count the cash in the drawer before the first sale.
For: Cashiers, Managers and owners
Unlock the till and go to Sell.
On Open the till, count the cash in the drawer and enter it.
Press Open shift.
Shifts appear only on plans and stores that use them.
Close a shift and count the cash
Count the drawer at the end of a shift. Any difference is recorded for the manager.
For: Cashiers, Managers and owners
Go to Manage (My till for cashiers), then Shift and cash.
Press Close shift.
Count the cash in the drawer and enter what you counted.
Confirm with That's what I counted.
Cashiers do not see the expected amount, so the count is honest and final. Managers see the difference and can print a Z report under Earlier shifts on this till.
Record cash paid in or taken out
Keep the drawer count right when cash moves for something other than a sale.
For: Managers and owners
Go to Manage, then Shift and cash.
Press Pay cash in or Pay cash out.
Enter the amount and the reason.
Stock
Receive deliveries and correct stock
Add a delivery, write off damaged goods or correct a stock count.
For: Stock clerks, Managers and owners
Go to Manage, then Stock.
Find the product.
Press its adjust button and enter how much to add or remove.
Choose a reason: Delivery received, Stock count correction, Damaged or expired, or Other.
Add a note such as the supplier's invoice number, then save.
Every change is kept in a permanent record, so stock can always be traced. It can be done offline and sent later.
Add and change products
Add products with prices, photos, sizes, colours and bulk prices, or import your whole price list.
For: Managers and owners
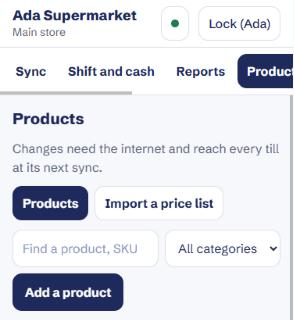
Go to Manage, then Products. Only owners and managers see it.
Press Add a product. Enter the name, category and price, and the opening stock you have now.
If it comes in sizes or colours, tick Comes in sizes or colours and add one line for each, each with its own price.
To sell cheaper in bulk, use Prices by quantity. The guide Set prices by quantity shows how, with pictures.
Enter the Cost price too, if you know it, so Reports can show profit. Cashiers never see it.
Press Add product. Then open it again to take or choose a photo.
To stop selling something, open it and untick Show on the till and the online shop. It is hidden, not deleted, so past sales stay correct.
To add many products at once, open Import a price list, choose your CSV file, check what it found, then import.
Changing products needs the internet. Every till picks the change up at its next sync.
Prices by quantity come with the Business plan.
Set prices by quantity (1 to 19, 20 to 49, 50 and more)
Sell cheaper when a customer buys more, the way wholesale price lists work. The till and online shop pick the right price by themselves.
For: Managers and owners
Go to Manage, then Products, and press Add a product. To change a product you already have, tap it in the list instead.
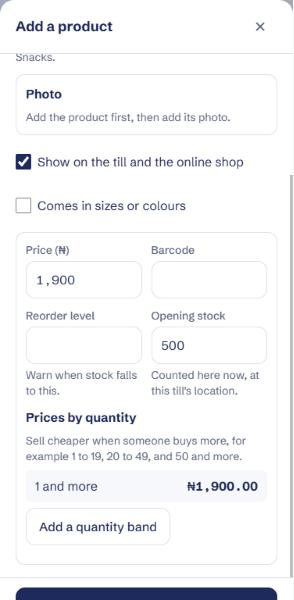
Enter the name, category and the normal price. The normal price is what one item costs.
Under Prices by quantity, press Add a quantity band.
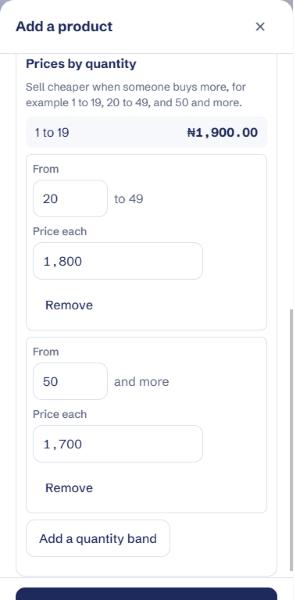
In From, enter the quantity where the cheaper price starts, such as 20. In Price each, enter the price for each item from that quantity, such as 1,800.
Press Add a quantity band again for the next band, such as from 50 at 1,700 each. The form shows the bands for you: 1 to 19, 20 to 49, and 50 and more.
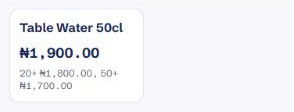
Press Add product, or Save changes. On the till the product now shows its prices by quantity.
When you sell, just enter how many. The till uses the right price: 25 bottles are charged at 1,800 each, 60 at 1,700 each.
Manage, then Products, then Add a product.The normal price covers 1 and up until you add a band.Two bands added: 20 to 49 at 1,800 and 50 and more at 1,700.On the Sell screen, the prices by quantity show under the product.
Each size or colour of a product can have its own bands.
To remove a band, press Remove under it, then save.
Prices by quantity come with the Business plan. You can also load them from a price list: use columns such as price_1_19, price_20_49 and price_50_plus.
Changing prices needs the internet. Every till picks the change up at its next sync.
See profit: add cost prices
Enter what you pay for each product, and Reports shows profit, profit on each item and the value of your stock.
For: Managers and owners
Go to Manage, then Products, and open a product.
Enter the Cost price: what you pay for one. The form shows the profit on each one at the normal price.
Press Save changes. Cashiers never see cost prices.
To add many at once, add a cost column to your price list and import it.
Open Manage, then Reports. Profit before expenses shows what you made, and Stock on hand shows what your stock is worth at cost.
Profit is counted without tax, only for items that had a cost price when they were sold. Reports say what share of sales that covers.
Each sale keeps the cost it was sold at, so changing a cost later never changes past profit.
Rent, salaries and other expenses are not taken off yet.
Staff
Add, change or remove staff
Give each person a name, a role and their own PIN.
For: Managers and owners
Go to Manage, then Staff.
Press Add staff and approve with a manager PIN.
Enter the name and choose a role: Cashier sells, Stock clerk adjusts stock, Manager can do everything.
Let the person type their own PIN, then save.
To change or remove someone, press Edit or Remove next to their name.
Staff need no email or password: their PIN works on every till in the store after the next sync.
Sync the tills before removing someone, so their sales are sent first.
Pay for Kiobomerce
Pay for your plan online with Paystack by card, bank transfer or USSD.
For: Managers and owners
Go to Manage, then This terminal, and find Pay for Kiobomerce.
Choose the plan, how long and any extra tills. The total shows below.
Press Pay with Paystack and pay in the window that opens.
Come back to the till and press Check payment. The new paid-until date shows under This terminal.
Paying before your current period ends adds the new period after it, so no day is lost.
A free trial stops new sales the day after it ends until you pay. Sales already made are kept.
Only the owner and managers can pay.
The Android, iPhone and iPad apps do not take payment. Pay from the till in a web browser, for example kiobomerce.com/pos on a computer.
See sales, refunds and stock across all tills
Reports add up every till in the store: sales by day, profit, best sellers, each cashier, how people paid, what customers owe, things to check, refunds, discounts and stock.
For: Managers and owners
Go to Manage, then Reports. Only managers and owners see it.
Choose a period, such as Today or This month, or pick your own dates.
If you have more than one location, choose one or leave All locations.
Read the time under Figures fetched. Press Refresh to get the latest figures.
Reports need the internet. The figures come from the server, not from this till.
A sale made offline appears once its till has synced, on the day it was really made. A till that has not synced yet is not counted.
Online shop orders are not in the sales figures, but they do reduce stock on hand.
Net sales are sales minus refunds given in the same period, even if the sale itself was earlier.
Stock on hand is always the amount right now, whichever period you choose.
Profit appears once products have cost prices. See the guide See profit: add cost prices.
Get the day's summary by email, and things to check
Each evening the owner gets the day's sales, money taken, best sellers and anything unusual, like a short drawer or big discounts.
For: Managers and owners
The email is on for every store and goes to the store owner at 9 pm.
To change who gets it or when, go to Manage, then Reports, and scroll to Evening email.
Enter one or more email addresses, choose the hour, and press Save. Press Turn off to stop it.
Reports also list Things to check for any period you choose.
Things to check: cash short or over at closing by ₦500 or more, discounts of 20% or more, a person whose refunds reach 10% of their sales, refunds with nothing put back in stock, and customers over their credit limit.
Each is something to ask about, not proof of wrongdoing. Damaged goods, for example, are refunded without going back in stock.
A day with no sales sends no email. Sales on a till that has not synced yet are not counted.
What each role can do
Cashiers sell, stock clerks handle stock and managers can do everything.
Cashier: Sell, Orders and My till, which holds Sync and their own shift. They do not see cash figures or shift history.
Stock clerk: Stock and Sync only.
Manager and owner: everything, including staff, tills, printers, Reports and the report on each shift.
A cashier can ask a manager to approve a refund or discount with a PIN at the counter.
Tills and printers
Connect a receipt or kitchen printer
Add a network, Bluetooth or USB printer and test it.
For: Managers and owners
Go to Manage, then Printers, and add a printer.
Name it and choose what it is used for and its type.
For a USB printer on a Windows computer, install the printer's Windows driver first, then choose This computer's printer. Each receipt opens the print window: pick the printer once and press Print.
For a network printer, enter its IP address. It is on the self-test page: hold the feed button while switching the printer on.
Save and press Test.
Bluetooth printers need the Android app.
Give a printer a backup so receipts still print if it fails. Failed jobs are listed on the same page, and the sale is safe either way.
Troubleshooting
Fix sales that are not sending
See what is waiting, what the problem is and how to send it again.
Go to Manage, then Sync. It shows what is waiting, the last successful sync and any problem.
If it is only waiting, check the internet. It sends by itself once connected.
If something is listed under Rejected by the server, read the reason and press Send again once it is fixed.
If it is still rejected, tell a manager. Do not reset the till.
A rejected sale is held on the till, not lost.
A sale from someone who has since been removed comes back rejected. Sync tills before removing staff.
Replace a broken or lost device
Remove the old till and set up a new one.
For: Managers and owners
On a working till, go to Manage, then Tills, and press Show all tills.
Press Remove on the lost device. It can no longer send or receive anything.
Set up the replacement with a setup code.
Sales already sent are safe on the server. Sales still waiting on a lost device cannot be recovered, so keep tills connected when you can.
To clear a working device, use Reset terminal under This terminal. It only works when every sale has been sent.
Payments
Check offline card payments
Match card sales taken while offline against the terminal's settlement report.
For: Managers and owners
When selling, choose Card (offline) and enter the approval code from your card terminal.
Later, go to Manage, then Offline card payments.
Check each one against the settlement report from the terminal.
Confirm it with the reference, or mark it as declined so it can be followed up.
Kiobomerce stores only the approval code, never card details.
Take payment by bank transfer
Record a sale paid by transfer to the store's account, once you have seen the money arrive.
For: Cashiers, Managers and owners
Ring up the sale and press Charge.
Choose Bank transfer and ask the customer to transfer the amount shown to the store account.
Wait until you see the money arrive, on the bank app or an alert.
Optionally type the sender name or reference, then press Transfer received.
The till records what the cashier saw; it does not check the bank. Owners can compare Bank transfer in Reports with the bank statement.
A sale can be split: part cash, part transfer.
Take QR and online payments
Paystack, Flutterwave and Paga appear at Charge once connected to your store.
Ask us to connect your Paystack, Flutterwave or Paga account. Online payments depend on your plan.
At Charge, choose the method. The customer scans the QR code or receives a request to pay.
Wait for the till to confirm. Do not hand over goods until it does.
These methods need the internet. Without it, the till explains why they are unavailable.
Online shop
Sell online from your shop
Your online shop sells from the stock in your Online location.
For: Managers and owners
Decide how much of each product to offer online.
Ask us to place that quantity in your Online location.
Share your shop's address with customers.
A product shows Sold out online until it has stock in the Online location, even if the shop has plenty.
Your account
Your plan, tills and renewal date
Check your plan and paid date, and know what happens when it ends.
For: Managers and owners
Go to Manage, then This terminal, to see the date your subscription is paid until.
Managers also see a reminder on the till in the last 30 days. Email reminders go to the owner at 60, 30, 7 and 0 days.
To renew, upgrade or add tills, contact Kiobomerce.
Your tills keep selling after the date passes, so your business never stops.
How your data is kept safe
What protects your sales, and what you should do to help.
Each till signs what it sends with its own key, so the server knows which device it came from.
Every sale is applied once, however many times the connection drops and retries.
Stock changes and important actions are kept in records that cannot be edited.
The server's database is backed up every night, encrypted, to a separate location.
Give each person their own PIN and do not share it. That is what makes the records mean something.